前言:
網頁中常用Multi Select或稱ListBox供使用者多選Items,如:
<select multiple>
<option value="Taiwan">Taiwan</option>
<option value="USA">USA</option>
</select>
或
@Html.ListBox("country", null, new {multiple = multiple})
當option items render後,又沒有被點選,會發生回傳item為null的狀況,
該如何處理?
作法:
● 在form post前,將option加上selected的屬性。
$('form').submit(function(){
$('#target option').attr("selected", "selected");
});
若上述做法行不通,可使用下面方法:
● append option value到某一hidden element,再post到後端。
參考資料:

2018年6月26日 星期二
[Python/Package] macOS安裝keras與TensorFlow(搭配Virtualenv與jupyter notebook)
前言:
Keras與TensorFlow都是machine learning的套件,
Keras較適合入門,並可選擇run在TensorFlow、CNTK或Theano上。
該例使用Python 3,另TensorFlow website推薦macOS在10.12.6(Sierra)或以上。
安裝步驟:
打開Terminal,打指令:

~/keras代表在使用者下建立keras資料夾。
接著打指令:

再來打指令:

繼續打指令:


此時已將keras跟TensorFlow安裝在Virtualenv內了。
安裝後,可以做個簡單的測試,是否有成功安裝:


執行import後,沒有錯誤訊息,代表有安裝進去。
最後在Virtualenv安裝jupyter notebook的kernel:


最後,啟動jupyter notebook:


最後,執行畫面如下 :

參考資料:
https://www.tensorflow.org/install/install_mac
https://stackoverflow.com/questions/42449814/running-jupyter-notebook-in-a-virtualenv-installed-sklearn-module-not-available
Keras與TensorFlow都是machine learning的套件,
Keras較適合入門,並可選擇run在TensorFlow、CNTK或Theano上。
該例使用Python 3,另TensorFlow website推薦macOS在10.12.6(Sierra)或以上。
安裝步驟:
打開Terminal,打指令:
virtualenv --system-site-packages -p python3 targetDirectory
~/keras代表在使用者下建立keras資料夾。
接著打指令:
cd targetDirectory
$ source ./bin/activate # If using bash, sh, ksh, or zsh
(targetDirectory)$ pip3 install --upgrade keras # for Python 3.n
(targetDirectory)$ pip3 install --upgrade tensorflow # for Python 3.n
此時已將keras跟TensorFlow安裝在Virtualenv內了。
安裝後,可以做個簡單的測試,是否有成功安裝:
(targetDirectory)$ python
(targetDirectory)$ import tensorflow as tf


最後在Virtualenv安裝jupyter notebook的kernel:
(targetDirectory)$ pip3 install ipykernel

(targetDirectory)$ python -m ipykernel install --user --name=virtualenv-name

最後,啟動jupyter notebook:
(targetDirectory)$ jupyter notebook點選jupyter notebook主畫面右上角的New,選擇剛建立在Virtualenv的kernel即可:

最後,執行畫面如下 :

參考資料:
https://www.tensorflow.org/install/install_mac
https://stackoverflow.com/questions/42449814/running-jupyter-notebook-in-a-virtualenv-installed-sklearn-module-not-available
2018年5月31日 星期四
[CSS] 如何讓div element內的單行文字垂直置中(vertical center)
說明:
網頁上常用div element顯示區塊文字,水平置中可直接指定text-align:center,例:
<div style="text-align:center">test</div>
但文字垂直置中並沒有屬性可直接設定,
雖然有個vertical-align的屬性,不過是用在圖片置中上的...
那文字垂直置中該怎麼做?
作法:
答案是height跟line-height設一樣即可,例:
<div style="height:2vh;line-height:2vh">test</div>
不過為何這樣設定就可以讓文字垂直置中??
一般而言,line-height會大於font-size,
Content Area的高度由font-size決定,
line-height扣掉font-size後的高度,會平均分配在Content Area的上面跟下面(half-leading),
最後,line-height等於height,也就代表整個box的高度一致了。

參考資料:
https://stackoverflow.com/questions/8865458/how-do-i-vertically-center-text-with-css
https://stackoverflow.com/questions/8799164/how-does-line-height-vertically-center-text
https://www.slideshare.net/maxdesign/line-height
網頁上常用div element顯示區塊文字,水平置中可直接指定text-align:center,例:
<div style="text-align:center">test</div>
但文字垂直置中並沒有屬性可直接設定,
雖然有個vertical-align的屬性,不過是用在圖片置中上的...
那文字垂直置中該怎麼做?
作法:
答案是height跟line-height設一樣即可,例:
<div style="height:2vh;line-height:2vh">test</div>
不過為何這樣設定就可以讓文字垂直置中??
一般而言,line-height會大於font-size,
Content Area的高度由font-size決定,
line-height扣掉font-size後的高度,會平均分配在Content Area的上面跟下面(half-leading),
最後,line-height等於height,也就代表整個box的高度一致了。

參考資料:
https://stackoverflow.com/questions/8865458/how-do-i-vertically-center-text-with-css
https://stackoverflow.com/questions/8799164/how-does-line-height-vertically-center-text
https://www.slideshare.net/maxdesign/line-height
2018年4月29日 星期日
[Python Package] Mac OS安裝Matplotlib Basemap套件過程記錄
說明:
Basemap是python中畫平面地圖的套件,使用PROJ將地球的經緯度投影至平面上,
以下記錄安裝的過程。
做法:


參考資料:
https://matplotlib.org/basemap/users/installing.html
https://gis.stackexchange.com/questions/8120/importerror-no-module-named-pyproj/8136#8136
Basemap是python中畫平面地圖的套件,使用PROJ將地球的經緯度投影至平面上,
以下記錄安裝的過程。
做法:
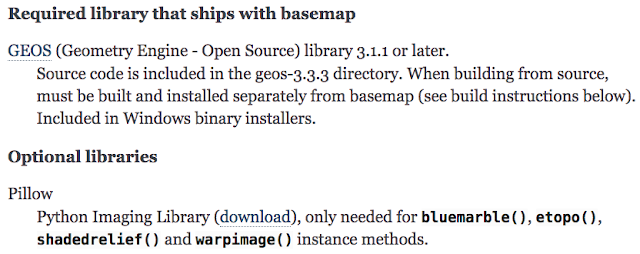
- 根據官網的指示安裝下述套件,大部分都用pip install。

PROJ依據其網頁建議,使用Homebrew安裝,

安裝的過程若遇到:
Error: Xcode alone is not sufficient on xxx(mac os version).
Install the Command Line Tools:
xcode-select --install
不要懷疑,下指令xcode-select --install,將會安裝所需的Command Line Tools。
再下指令brew install proj。

即完成PROJ安裝。
- 接下來是GEOS,若沒安裝過,可用內含於basemap的geo-3.3.3版本,也可以自己下載最新版本。
- Pillow沒用所以我沒裝。

- 最後下載basemap的tar.gz版本。解壓縮後,開啓終端機cd到basemap主目錄。
- 如果沒安裝過GEOS,再cd到geo-3.3.3目錄。
- 下指令:export GEOS_DIR=/usr/local
- 下指令:./configure --prefix=$GEOS_DIR
- 下指令:make; make install
- 若是安裝過GEOS,且geos_c.h在/usr/local/include下與libgeos_c在/usr/local/lib下,可參照下圖,則設定GEOS_DIR = /usr/local
- 若GEOS不是裝在/usr/local,請自行設定GEOS_DIR。
- 切回basemap主目錄
- 下指令:python3 setup.py install (使用python3.6)
- 下指令:python3 simpletest.py
- 若出現:ModuleNotFoundError: No module named 'pyproj',代表需再安裝pyproj,可下指令pip3 install pyproj
- 若以上指令皆執行成功,可執行example下的單一python檔確認(如:counties.py),若是執行run_all.py,會跑很多demo程式碼。
執行相關畫面如下圖。

參考資料:
https://matplotlib.org/basemap/users/installing.html
https://gis.stackexchange.com/questions/8120/importerror-no-module-named-pyproj/8136#8136
2018年3月31日 星期六
[.Net] HttpRuntime.Cache.Insert中absoluteExpiration與slidingExpiration可共存??
說明:
在MSDN查HttpRuntime.Cache.Insert說明時,看到下面這段文字:

如果沒搞錯意思,應該是說在slidingExpiration設個參數(大於0),在absoluteExpiration設為DateTime.Now.Add(該參數),可以有如上說明的效果。
但不是說absoluteExpiration與slidingExpiration不能共存嗎???

有看沒有懂,實際測試看看(.Net framework 4.5.2 + MVC 5.2.3):

實際執行,出現ArgumentException,
看起來absoluteExpiration與slidingExpiration不能同時生效。
後來使用.Net framework4 + WebForm測試,也是一樣的Exception。

資料來源:
https://msdn.microsoft.com/en-us/library/4y13wyk9(v=vs.110).aspx
在MSDN查HttpRuntime.Cache.Insert說明時,看到下面這段文字:

如果沒搞錯意思,應該是說在slidingExpiration設個參數(大於0),在absoluteExpiration設為DateTime.Now.Add(該參數),可以有如上說明的效果。
但不是說absoluteExpiration與slidingExpiration不能共存嗎???

有看沒有懂,實際測試看看(.Net framework 4.5.2 + MVC 5.2.3):

實際執行,出現ArgumentException,
看起來absoluteExpiration與slidingExpiration不能同時生效。
後來使用.Net framework4 + WebForm測試,也是一樣的Exception。

資料來源:
https://msdn.microsoft.com/en-us/library/4y13wyk9(v=vs.110).aspx
2018年3月3日 星期六
[Tool] OpenQA.Selenium.DriverServiceNotFoundException: The geckodriver.exe file does not exist...
說明:
測試專案加入Selenium Web Driver 3.9.1,使用FirefoxDriver,
第一次啟動測試後出現錯誤:
OpenQA.Selenium.DriverServiceNotFoundException: The geckodriver.exe file does not exist in the current directory or in a directory on the PATH environment variable. The driver can be downloaded at https://github.com/mozilla/geckodriver/releases.
解法:
這是因為Firefox(FF) 48後的engine改為gecko driver了,
因此Selenium 3.0後,就使用gecko driver取代FF預設WebDriver的實作,
至於為何會改用gecko driver?
那要先介紹Gecko,Gecko是:
● It's a free and open source project.
● 內容是Layout engine,提供許多API讓application可以顯示web page或當使用者介面。
● 相容於W3C定義的WebDriver標準。
● 後來由Mozilla基金會與公司維護。
參考資料:
https://stackoverflow.com/questions/40657443/how-to-set-up-selenium-3-0-getting-error-the-geckodriver-exe-file-does-not-exi
http://qavalidation.com/2016/08/whats-new-in-selenium-3-0.html/
https://en.wikipedia.org/wiki/Gecko_(software)
https://developer.mozilla.org/en-US/Firefox/Multiprocess_Firefox
https://blog.mozilla.org/futurereleases/2016/08/02/whats-next-for-multi-process-firefox/
測試專案加入Selenium Web Driver 3.9.1,使用FirefoxDriver,
第一次啟動測試後出現錯誤:
OpenQA.Selenium.DriverServiceNotFoundException: The geckodriver.exe file does not exist in the current directory or in a directory on the PATH environment variable. The driver can be downloaded at https://github.com/mozilla/geckodriver/releases.
解法:
這是因為Firefox(FF) 48後的engine改為gecko driver了,
因此Selenium 3.0後,就使用gecko driver取代FF預設WebDriver的實作,
至於為何會改用gecko driver?
那要先介紹Gecko,Gecko是:
● It's a free and open source project.
● 內容是Layout engine,提供許多API讓application可以顯示web page或當使用者介面。
● 相容於W3C定義的WebDriver標準。
● 後來由Mozilla基金會與公司維護。
而Gecko有支援multi-processing(能讓UI在不同process處理)架構,
當時整個FF 47還跑在同一個process,因此48版後改用gecko driver。
所以現在啟動測試,使用FirefoxDriver需透過gecko driver來啟動FF,
正如錯誤訊息所示,到https://github.com/mozilla/geckodriver/releases下載,
目前最新版是v.0.19.1,下載後解壓縮到特定資料夾,
我直接放到FF安裝資料夾內,然後到系統:

找到環境變數

在Path,新增一筆gecko driver的放置路徑,放在使用者變數也行。

最重要的是,設定後要重開VS。
當時整個FF 47還跑在同一個process,因此48版後改用gecko driver。
所以現在啟動測試,使用FirefoxDriver需透過gecko driver來啟動FF,
正如錯誤訊息所示,到https://github.com/mozilla/geckodriver/releases下載,
目前最新版是v.0.19.1,下載後解壓縮到特定資料夾,
我直接放到FF安裝資料夾內,然後到系統:


最重要的是,設定後要重開VS。
參考資料:
https://stackoverflow.com/questions/40657443/how-to-set-up-selenium-3-0-getting-error-the-geckodriver-exe-file-does-not-exi
http://qavalidation.com/2016/08/whats-new-in-selenium-3-0.html/
https://en.wikipedia.org/wiki/Gecko_(software)
https://developer.mozilla.org/en-US/Firefox/Multiprocess_Firefox
https://blog.mozilla.org/futurereleases/2016/08/02/whats-next-for-multi-process-firefox/
2018年2月28日 星期三
[Tool] 初探Katalon Recorder搭配MSTest建構Web UI測試教學
前言:
近幾年來,測試成為顯學,去年3月在.Net社群研討會,
見識到91哥介紹了3套測試工具,最有印象的就是Selenium IDE了,
直到近期才研究使用,以下是我的使用紀錄。
正文開始:
首先,Selenium IDE是Firefox的附加元件(add-on)裡的擴充套件(Extension),
可用來錄製、編輯、回放與偵錯測試。
遺憾的是,Selenium IDE只支援到Firefox 54.x版,
因此,若要使用IDE,可使用54.0.1或以下的免安裝版本。

而且預設沒有C#+MSTest的範本(雖然可使用91哥的MSTest範本),
加上用舊版的Firefox難免有些不便,因此改用Katalon Recorder來試試。
先拿Chrome來測試,到chrome應用程式或google搜尋Katalon Recorder結果第一筆,
找到後,點選加到CHROME。

Chrome右上角應該會出現圖示,點擊打開Katalon Recorder,點選New,輸入Test Case's name。

打開要測試的網頁,再點選Record,使用錄製功能來產生測試腳本,
再微調Command,這樣的方式較快。
那什麼是Command呢? 以Selenese來講,有以下3種:
有以下6種方式(簡單範例):
只要點選Record,可自動產生上述說的Command、Target與Value(It depends.)

以下是實際錄製的過程。另assertText等Command,跟Selenium一樣,
在元素上右鍵,就可看到相關Command。

產出測試腳本後,可以再微調command,例:將click 表單欄位的command移除。

接著可將測試腳本Export出來,選擇要跑測試的語言與測試framework,
本例選擇C#+MSTest,即可將產生的程式碼貼進專案,
如果點選Save As File...,會以Test case名稱去掉底線命名,再加進專案即可。
另外,Katalon儲存是以Test Suite為單位。Export則是Test Case為單位。

測試專案需參考3個package:

to be continued...
參考資料:
https://addons.mozilla.org/zh-TW/firefox/addon/selenium-ide/
https://www.guru99.com/locators-in-selenium-ide.html
近幾年來,測試成為顯學,去年3月在.Net社群研討會,
見識到91哥介紹了3套測試工具,最有印象的就是Selenium IDE了,
直到近期才研究使用,以下是我的使用紀錄。
正文開始:
首先,Selenium IDE是Firefox的附加元件(add-on)裡的擴充套件(Extension),
可用來錄製、編輯、回放與偵錯測試。
遺憾的是,Selenium IDE只支援到Firefox 54.x版,
因此,若要使用IDE,可使用54.0.1或以下的免安裝版本。

加上用舊版的Firefox難免有些不便,因此改用Katalon Recorder來試試。
先拿Chrome來測試,到chrome應用程式或google搜尋Katalon Recorder結果第一筆,
找到後,點選加到CHROME。

Chrome右上角應該會出現圖示,點擊打開Katalon Recorder,點選New,輸入Test Case's name。

打開要測試的網頁,再點選Record,使用錄製功能來產生測試腳本,
再微調Command,這樣的方式較快。
那什麼是Command呢? 以Selenese來講,有以下3種:
- Actions:對element操作,常見的有type、open、clickAndWait等。
- Accessors:儲存element的value。
- Assertions:驗證測試的條件是否滿足。有Assert、Verify與WaitFor,其中Assert跟Verify差異在Assert fail,則測試中斷,Verify則是log起來繼續執行。
有以下6種方式(簡單範例):
| Locator | Html | Target |
| ID | <input id="email"> | id=email |
| Name | <input name="email"> | name=email |
| Link Text | <a href="#">Mail</a> | link=Mail |
| CSS Selector | <input class="form-group"> <span data-toggle="collapse"></span> |
css=input.form-group css=span[data-toggle=collapse] |
| DOM | <input id="email"> | document.getElementById("email") |
| XPath | <html><body> <table> <tr> <td>123</td> <td>456</td> </tr> </table> </body></html> |
//html/body/table/tr/td[2] |
只要點選Record,可自動產生上述說的Command、Target與Value(It depends.)

以下是實際錄製的過程。另assertText等Command,跟Selenium一樣,
在元素上右鍵,就可看到相關Command。

產出測試腳本後,可以再微調command,例:將click 表單欄位的command移除。

接著可將測試腳本Export出來,選擇要跑測試的語言與測試framework,
本例選擇C#+MSTest,即可將產生的程式碼貼進專案,
如果點選Save As File...,會以Test case名稱去掉底線命名,再加進專案即可。
另外,Katalon儲存是以Test Suite為單位。Export則是Test Case為單位。

測試專案需參考3個package:
- Selenium.WebDriver
- Selenium.Support
- Selenium.WebDriver.ChromeDriver(若使用Chrome測試,預設是Firefox)

to be continued...
參考資料:
https://addons.mozilla.org/zh-TW/firefox/addon/selenium-ide/
https://www.guru99.com/locators-in-selenium-ide.html
訂閱:
文章 (Atom)